| Polar Align Your Telescope, Here's How. | |
| Articles | AstroGuide | Calendar | Classifieds | Constellations | Forums Meteors | Moon | News | Photography | Planets | Shop | Other Sites |
|

|
|
|
|
|||
|
|
|||||
by
Craig Hill

| Balancing the Declination Axis |
 The
first thing we need to do is set the scope on the mount, and balance it.
Put your weight on the mount, then the scope. As you look at the mount,
you will see the two setting circles on it. One right under the scope tube
is the Declination
Setting Circle. The
first thing we need to do is set the scope on the mount, and balance it.
Put your weight on the mount, then the scope. As you look at the mount,
you will see the two setting circles on it. One right under the scope tube
is the Declination
Setting Circle. |
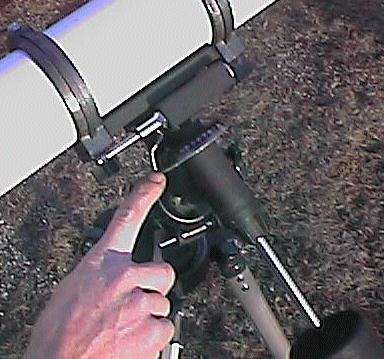
 There are also screws to hold the two major axis' tight. Make sure the screw
that holds the axis with the weight is tight, and then loosen the screw
that will allow the scope to turn. Next, move the scope back and forth in
it's mounting rings until you can move it to any position, and it stays
where you leave it. Try to do this part with an eyepiece and any other accessories
you may be using attached to the scope, so as to get an accurate balance.
There are also screws to hold the two major axis' tight. Make sure the screw
that holds the axis with the weight is tight, and then loosen the screw
that will allow the scope to turn. Next, move the scope back and forth in
it's mounting rings until you can move it to any position, and it stays
where you leave it. Try to do this part with an eyepiece and any other accessories
you may be using attached to the scope, so as to get an accurate balance. |
| Balancing the Right Ascension Axis |
Next, we want to tighten the Declination Axis screw,
and loosen the other one, for balancing the Right Ascension Axis. The Right
Ascension, or R/A axis, is the one that your weight is screwed into. The
other setting circle here is for this axis.  R/A
Setting Circle Once we have loosened the screw holding this axis, we
want to get the weight adjusted so that the scope can swing from side to
side, again, staying in place wherever you place it. Balancing the scope
saves wear and tear on your mount's gears, and allows for easy movement
when looking for objects. You never really loosen the dscrews all the way
up, but just enough so that the scope moves with just a slight resistance
on either axis. Usually, once you have balanced the R/A axis, the weight
need not be moved again, so when you take the scope down, just un-screw
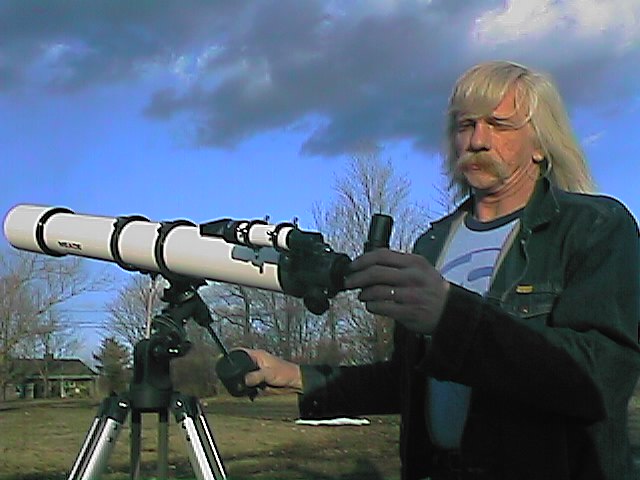
the weight, shaft and all, and store it this way. This is a picture of balancing
the Right Ascension Axis R/A
Setting Circle Once we have loosened the screw holding this axis, we
want to get the weight adjusted so that the scope can swing from side to
side, again, staying in place wherever you place it. Balancing the scope
saves wear and tear on your mount's gears, and allows for easy movement
when looking for objects. You never really loosen the dscrews all the way
up, but just enough so that the scope moves with just a slight resistance
on either axis. Usually, once you have balanced the R/A axis, the weight
need not be moved again, so when you take the scope down, just un-screw
the weight, shaft and all, and store it this way. This is a picture of balancing
the Right Ascension AxisAnd finally, a picture showing The Final Balance |
| Aligning to the North Star |
Ok..Now that we have the scope balanced so that
it will move in either direction freely, and stay put wherever we let go
of it, it's time to "Polar Align" it. First, we will need to set the "Latitude
Adjustment" to our particular Latitude, which can be obtained by calling
a nearby airport, and asking what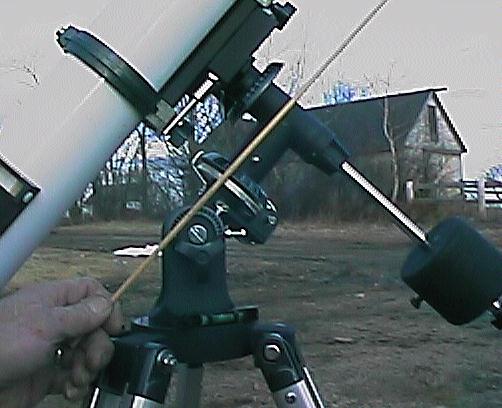 the latitude is for your area. The object of adjustment to the latitude,
is to have the scope point right at the North Star when the Declination
axis is set to 90 degrees, and the R/A axis is set to your latitude. While
aligning the scope to the North Star, have the weight pointing straight
down also. Now... all scopes' latitude adjustment scales are not accurate,
and there are always "differences" in actual latitude and the setting scale..
SO... with the declination
setting circle set exactly to 90 degrees, and the weight pointing straight
down, BOTH axis' LOCKED at this point, simply move the Latitude adjustment
until the North Star is centered in the scope. You may have to move the
base of the mount, or the whole tripod to one side or the other now to center
the North Star. The closer you can get the North Star to the center of the
eyepiece, the better the mount will track, and the more accurate the setting
circles will be for finding objects by their "Celestial Coordinates". Also
important, is to have the base of the mount level. This can be accomplished
by using a small level, and adjusting leg heights until the base is level.
Most mounts have a screw stop for the Latitude adjustment on them. Once
you have set the Latitude, it's a good idea to set this stop screw so that
the scope doesn't "creep down" during your observing session. Now that you
have completed this process, (and just so that you know, when you actually
do this set-up a few times, it will take mere minutes to complete), we are
ready to track objects that we find by simply turning only the gear on the
R/A Axis. As the object moves across the sky, simply turn the R/A axis,
and follow it. This is also the axis a motorized mount would move. VERY
IMPORTANT!! As you use the scope to find objects, NEVER move the base of
the mount once it is aligned, and NEVER allow the weight to be in a position
higher than the scope tube, as it may slide down and damage the scope or
mount. If the weight seems to want to become higher then the scope, you
have to turn the scope around on the mount, and then rotate the tube. REMEMBER..
the Polar Axis MUST remain pointing at the North Star. Also be careful that
the eyepiece does not fall out of the scope as you turn it.
the latitude is for your area. The object of adjustment to the latitude,
is to have the scope point right at the North Star when the Declination
axis is set to 90 degrees, and the R/A axis is set to your latitude. While
aligning the scope to the North Star, have the weight pointing straight
down also. Now... all scopes' latitude adjustment scales are not accurate,
and there are always "differences" in actual latitude and the setting scale..
SO... with the declination
setting circle set exactly to 90 degrees, and the weight pointing straight
down, BOTH axis' LOCKED at this point, simply move the Latitude adjustment
until the North Star is centered in the scope. You may have to move the
base of the mount, or the whole tripod to one side or the other now to center
the North Star. The closer you can get the North Star to the center of the
eyepiece, the better the mount will track, and the more accurate the setting
circles will be for finding objects by their "Celestial Coordinates". Also
important, is to have the base of the mount level. This can be accomplished
by using a small level, and adjusting leg heights until the base is level.
Most mounts have a screw stop for the Latitude adjustment on them. Once
you have set the Latitude, it's a good idea to set this stop screw so that
the scope doesn't "creep down" during your observing session. Now that you
have completed this process, (and just so that you know, when you actually
do this set-up a few times, it will take mere minutes to complete), we are
ready to track objects that we find by simply turning only the gear on the
R/A Axis. As the object moves across the sky, simply turn the R/A axis,
and follow it. This is also the axis a motorized mount would move. VERY
IMPORTANT!! As you use the scope to find objects, NEVER move the base of
the mount once it is aligned, and NEVER allow the weight to be in a position
higher than the scope tube, as it may slide down and damage the scope or
mount. If the weight seems to want to become higher then the scope, you
have to turn the scope around on the mount, and then rotate the tube. REMEMBER..
the Polar Axis MUST remain pointing at the North Star. Also be careful that
the eyepiece does not fall out of the scope as you turn it. |
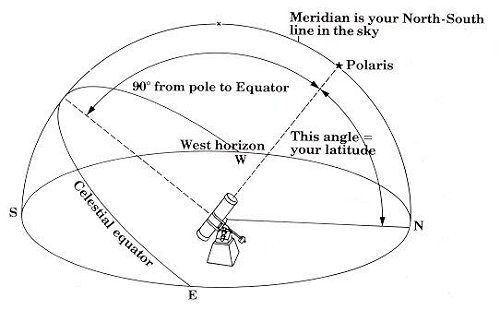
A Graphic representation of Polar Alignment
and the Celestial Sphere.
| Using the Mount to Locate Objects |
| Now that we are all set up, balanced and Polar Aligned, we can use the mount to find objects by their "Celestial Coordinates". First, you will notice that the Declination Setting Circle does NOT rotate. It is set at the factory, and needs to remain where it is. The Right Ascension Setting Circle DOES rotate, and is changed when we use it to find objects. To begin, we must first set the scope to a star with a known address. We will use a "circumpolar star", or one that is visible all year long from a Latitude of 40 degrees North... Beta Ursa Major, or Merak. This star is the bottom right star of the bowl of the Big Dipper. Its Celestial Coordinates are..11 hours, 1 Minute of R/A.. so.. we get this star in the center of our eyepiece, and quickly set the R/A setting circle to 11 Hours. The numbers on this circle represent hours and minutes. on my mount, the divisions are in 10 minute increments. The declination of this star is +56 degrees.. 23 minutes. This should already be where the declination circle is, if you have set up the mount properly. Now, moving quickly, because as the stars move across the sky, the R/A moves with them, find the coordinates of an object you wish to find, and move the scope on its two loosened axis' until both the R/A setting circle, (without touching the R/A circle) AND the Declination circle read the star's address. If you have done everything correctly, the object should be in or near the center of the eyepiece in the scope. You MAY need to move the scope around just a LITTLE to find the object, but it will be very near to where you are pointing the scope. |
As I said in the beginning, this page is simply intended to help the new
person understand how to use an Equatorial Mount. If you have ANY questions,
or something does not seem clear,
PLEASE E Mail me at Craig
It is my intention to make this page as easy to understand as possible. Your
comments are really appreciated, Thanks!! And Clear Skies!!
| Additional Information |
|---|
| About Astronomy Net | Advertise on Astronomy Net | Contact & Comments | Privacy Policy |
|
Unless otherwise specified, web site content Copyright 1994-2026 John Huggins All Rights Reserved "dbHTML," "AstroGuide," "ASTRONOMY.NET" & "VA.NET" are trademarks of John Huggins |