| Lurie-Houghton Telescope Design | |
| Articles | AstroGuide | Calendar | Classifieds | Constellations | Forums Meteors | Moon | News | Photography | Planets | Shop | Other Sites |
|

|
|
|
|
|||
|
|
|||||
| by Rick Scott December 23, 2002 |
Lurie-Houghton Telescope Design with a Comparison to the Newtonian Telescope. |
In the spring of 1999, I was reading the telescope design "bible", Telescope Optics by Harrie Rutten and Martin van Venrooij. I was reading it just to learn more about telescopes in general and about Schmidt Cassegrains in particular, because I own an old Celestron 8. In chapter 13, "Other Compound Systems", I read about a design known as the Lurie-Houghton. I found the design to be very intriguing because it seemed to offer an excellent balance between the various trade-offs that need to be made to achieve a great performing telescope. The authors had this to say about the design, "The Lurie instrument seems to be an almost ideal rich field telescope for the demanding amateur". The design they investigated in their book is an 8" f/4 system. After finishing the book, I kept re-reading the section on the Lurie-Houghton and comparing it to the other telescope designs in the book until I decided I needed to build one.
The same authors also wrote about this design in the ATM Journal, issue #1, Fall 1992. To derive the particular design I'm currently building, I used the optional software for their book as a starting point and fine tuned it using OSLO LT from Sinclair Optics. OSLO LT is a full blown optical design software tool that performs ray tracing and other optical analysis. Read my review of the program for more details.
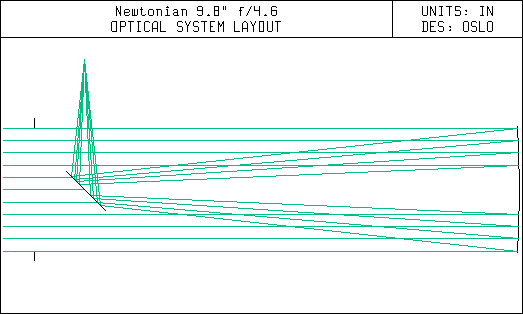
The idea of building a telescope was not something I had contemplated before. This was a major decision for me, especially in light of the complexities of this particular telescope design. Most amateur astronomers and telescope makers use the Newtonian design, which is the simplest practical form of a reflecting telescope. Refer to the following drawing. The Newtonian telescope uses a paraboloidal mirror at the back end of the telescope tube to reflect and focus the light. A small mirror near the front of the tube and mounted at a 45 degree angle is used to direct the focused light sideways out of the tube to an eyepiece.
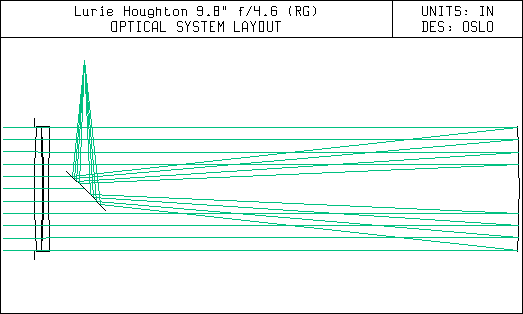
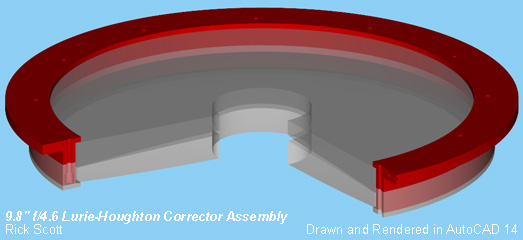
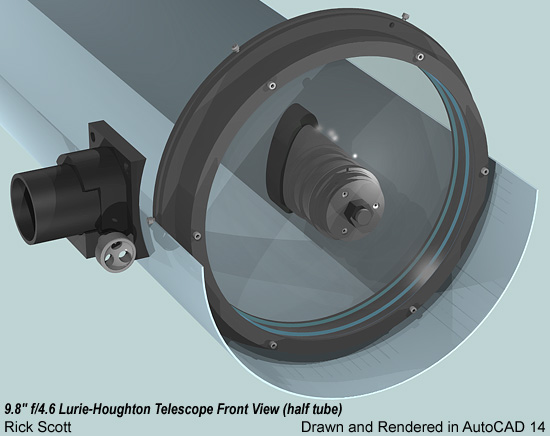
The Lurie-Houghton design uses a similar arrangement of mirrors except the main or primary mirror has a spheroidal surface instead of a paraboloid. Also, two full aperture lenses are used at the front of the tube to correct for the aberrations due to the use of the spheroidal mirror. Refer to the following drawing. The two lenses together are referred to as the corrector lens or just the corrector. The addition of the corrector to the telescope adds the complexity of making two large lenses to the design.
Why would anyone add this extra complexity (and cost) to a telescope?
I enjoy viewing the planets and other objects through my current telescope, but I really like to look at the various star clusters, nebulas and galaxies the sky has to offer. Many of these are larger than the field of view of the 8" f/10 Schmidt Cassegrain telescope I currently use. A short focal ratio Newtonian like a 10" f/4.5 would offer me wider fields of view, but the trade-off is higher distortion in the stars off axis. The corrector reduces the distortion to negligible levels. I also want to photograph through the telescope and the Newtonian has a curved focal (image) plane, but the Lurie-Houghton has an almost flat focal plane. More details with actual numbers are presented later in this article.
Another advantage of having the corrector lens is that it acts as an optical window at the front of the telescope. This controls the air currents in the telescope tube which reduces blurring and contrast reduction of the image. By closing off the tube, the mirrors and interior of the telescope also stay cleaner.
How big should it be?
The aperture and focal ratio of all telescopes are compromises determined by factors such as cost, weight, size as much as desired optical performance. The telescope I've been using so far is an old Celestron 8 from the early 1970's (Celestron Pacific) that has an 8" aperture. It has been fine from the viewpoint of aperture size, but I wanted something a little bigger. I do have to transport the scope around and a 10" mirror would be reasonable to move. The effect on the image by atmospheric turbulence is also affected by the size of the aperture. As the aperture increases, so does the effects of the atmosphere. My research indicated that a scope around 8" to 10" is at the transition region where the image changes from moving around with some blurring to just becoming blurry, so 10" is the aperture I settled on.
The next decision is the focal ratio which determines the focal length of the telescope. The design that Rutten and Venrooij analyzed is an 8" f/4. If I scaled their design, I would have a 10" f/4 which has a focal length of 40". My Celestron 8 has a focal length of 80". This is great for planetary viewing, because it doesn't require extremely short focal length eyepieces for decent views. A 40" focal length would require eyepieces with half the focal length for the same size image. If I made a Lurie-Houghton with an 80" focal length, I would end up with fields of view not larger than my Celestron offers, so I settled on a compromise of 45". This is a very common focal length in amateur telescope, as seen by the large proliferation of 10" f/4.5 telescope in the market. I still need a shorter focal length eyepiece than I currently have or I can use a Barlow lens to magnify the image for planetary work. With my current 1.25" barrel 26mm eyepiece, my Lurie-Houghton telescope will offer me a 1.2 degree field of view. With a low power 2" barrel eyepiece, I'll get field of views greater than 2 degrees.
What are the details of this Lurie-Houghton telescope?
The following table contains the design parameters for my implementation of the Lurie-Houghton telescope. The parameters for my original design and for the telescope as it actually ended up being built are shown.
| Description | Original Design |
As Built |
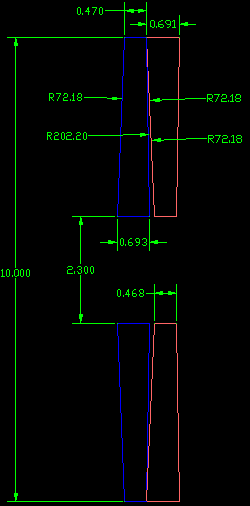
| First corrector lens (positive, BK-7 glass) (D = 10in, stopped down to 9.8in) |
R1 = 72.6in T1 = 0.608in R2 = -208.0in |
R1 = 72.18in T1 = 0.7052in R2 = -202.2in |
| Air space between corrector lenses | T2 = 0.116in | T2 = 0.116in |
| Second corrector lens (negative, BK-7 glass) (D = 10in, stopped down to 9.8in) |
R3 = -72.6in T3 = 0.375in R4 = 208.0in |
R3 = -72.45in T3 = 0.375in R4 = 199.50in |
| Air space between corrector and primary mirror | T4 = 37.5in | T4 = 37.0in |
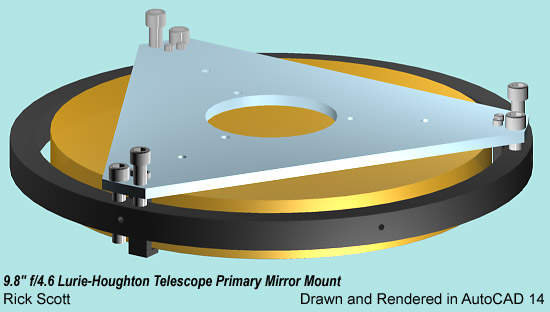
| Spherical primary mirror (Astrositall) (D = 10in) |
R5 =-89.764in | R5 =-90.43in |
| Air space between primary and secondary mirror | T5 = -34.6in | T5 = -35.1in |
| Flat diagonal mirror (D = 3.1in) | R6 = 0 | R6 = 0 |
| Distance from optical axis to focal plane | T6 = 10.217in | T6 = 10.058in |
| Radius of curvature of focal plane | R7 = 149in | R7 = 136in |
This drawing shows the details for the corrector lenses. I'm using AutoCAD Release 14 for all of the design drawings. Besides 2D drawings, I'm also modeling all of the parts using 3D solids. By doing this I can see how the parts fit together and it allows me to create 3D renderings.
How does the Lurie-Houghton compare to an equivalent Newtonian?
The following figures compare the performance of the Lurie-Houghton telescope I designed to a Newtonian telescope with the same aperture and focal ratio.
The spot diagrams
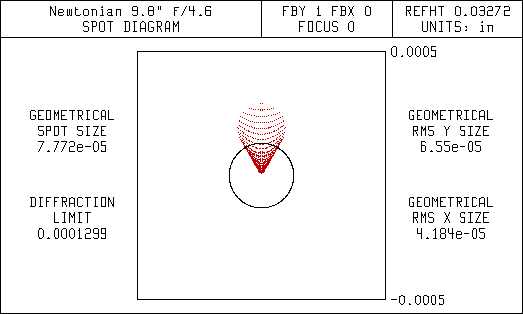
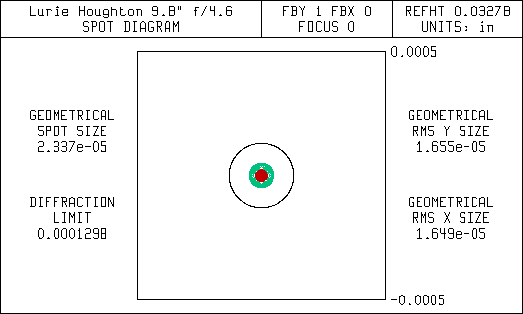
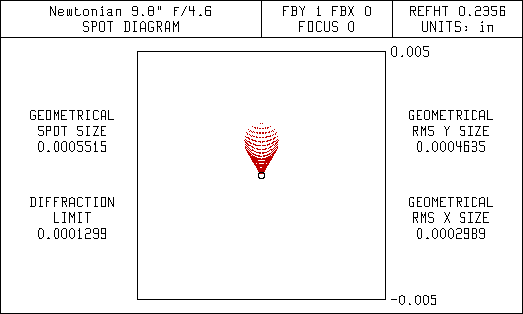
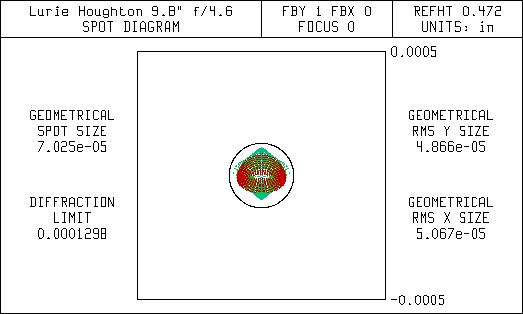
This first set of diagrams are spot diagrams. They show how the light is focused. The small black circle in the center of the spot diagrams represent the diffraction limit for a 9.8" aperture. It is the same size as the airy disc seen using a high power eyepiece. Ideally, all the light entering the telescope should focus within the diffraction limit. This is referred to as being diffraction limited. Most commercial telescope vendors will state their telescopes are diffraction limited, but they don't state over what field of view.
The spreading of the light in the Newtonian is mostly due to coma, but there is also some astigmatism. The corrector in the Lurie-Houghton eliminates the coma but leaves some astigmatism that is seen as spreading of the light bundle. Since the Newtonian uses only mirrors and no lenses it doesn't have any chromatic (color) aberrations. That's why the spot diagrams don't show any color effects. Note the scale change for the wider fields in the spot diagrams for the Newtonian. The coma is so bad that a large percentage of the light is far outside of the diffraction limit.
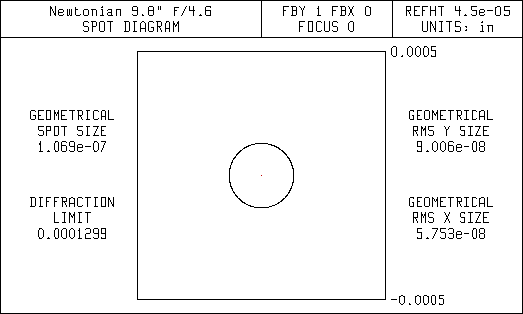
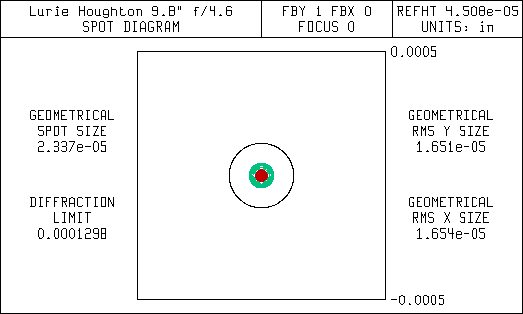
Spot Diagram 0.0417 Degrees Off-Axis (5 arc-min FOV)

Spot Diagram 0.3 Degrees Off-Axis (36 arc-min FOV)
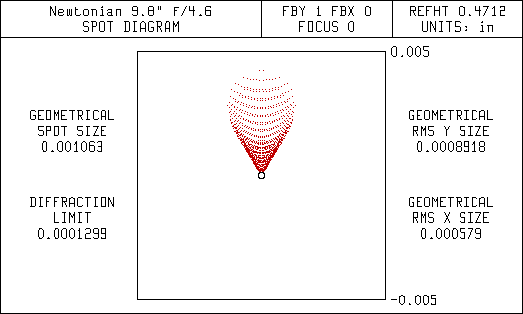
Spot Diagram 0.6 Degrees Off-Axis (72 arc-min FOV)
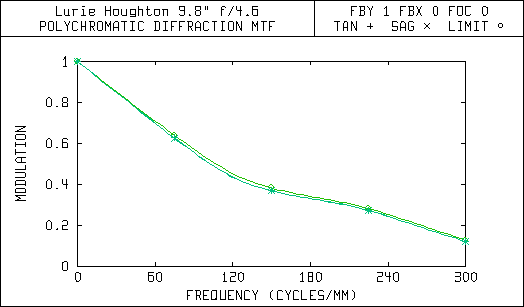
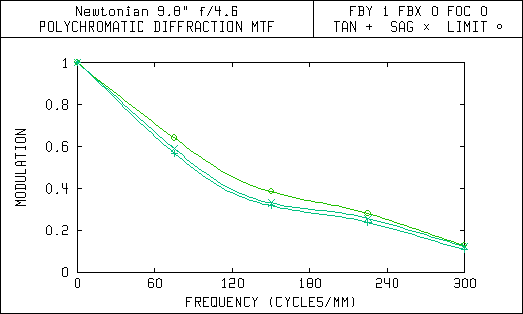
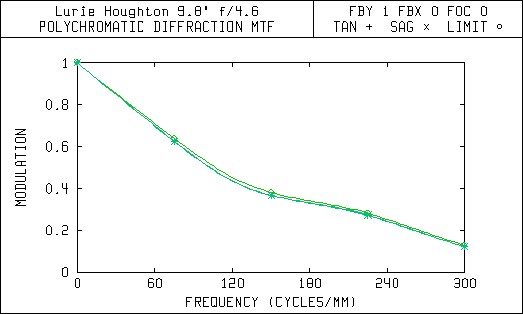
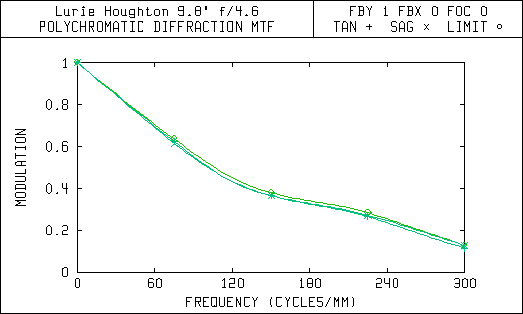
The modulation transfer curves
This second set of diagrams are the Modulation Transfer (MTF) curves. They show how the image contrast is affected by aberrations in the optical system. Each of these graphs have a line that shows the upper limit or maximum contrast possible for a given telescope design. The limit is set by the aperture size and amount of central obstruction due to the secondary mirror.
Notice in the MTF curves that the Newtonian with a 5 arc-minute field of view has almost the same amount of contrast degradation as the Lurie-Houghton with a 72 arc-minute or 1.2 degree field of view. The Lurie-Houghton provides a field of view over 14 times wider with the same amount of contrast reduction! Also, the spot diagrams show that the star images away from the center of view will be sharper and brighter in the Lurie-Houghton, because the light is still concentrated within the diffraction limited airy disc.
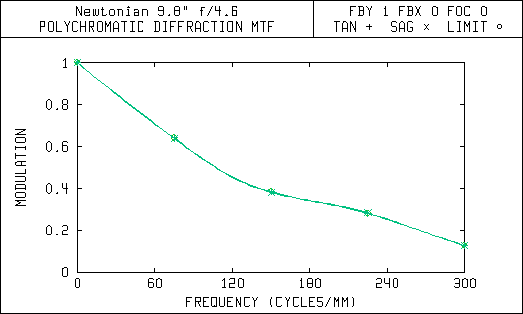
Modulation Transfer Function 0.0417 Degrees Off-Axis (5 arc-min FOV)
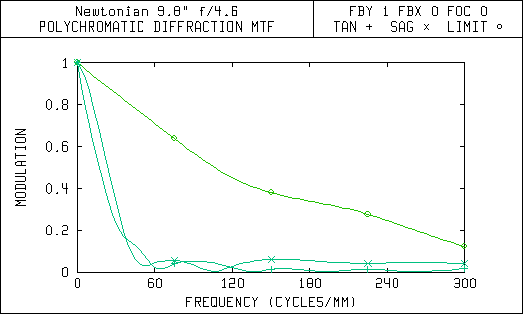
Modulation Transfer Function 0.3 Degrees Off-Axis (36 arc-min FOV)
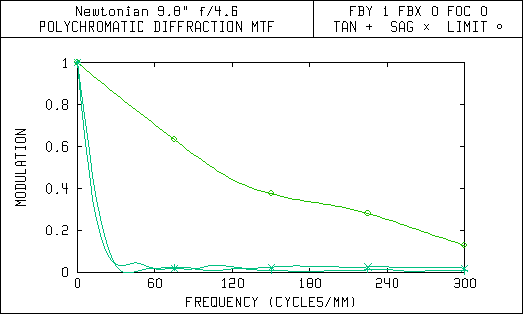
Modulation Transfer Function 0.6 Degrees Off-Axis (72 arc-min FOV)
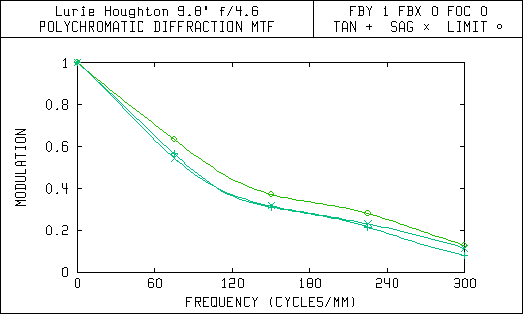
How does the central obstruction affect the contrast?
The central obstruction that is normally present in reflecting type telescope is there because some type of mirror is needed to reflect the light from the primary mirror to the eyepiece. Because the mirror focuses the light back along its central axis, the secondary mirror must be on that axis, causing it to block the central portion of the light path. If the secondary mirror is no larger than 20 percent of the diameter of the telescope aperture, it causes virtually no degradation to the contrast of the image. Using OSLO LT, I compared the on-axis modulation transfer curve of my Lurie-Houghton telescope to an ideal lens with the same focal length and no central obstruction. I also analyzed different size ideal lenses of the same focal length as my Lurie-Houghton to find the ideal unobstructed telescope that gave the same contrast performance.
By performing this exercise, I was able to find the aperture of an ideal telescope, if such a thing could be built, that would give equivalent contrast on objects such as the planets. I did this because in the telescope world, there is the equivalent of a Macintosh vs. PC battle. In this case, the battle is between refracting (unobstructed) and reflecting (obstructed) telescopes. The refracting camp states that no amount of obstruction is tolerable. The results of my analysis, seen in the following figure, shows that an ideal (no aberrations) telescope with no obstruction and a 6.6" aperture would have the same contrast as my telescope for medium resolutions (ie. planetary observing). The graph also shows that the larger aperture with obstruction (in this case 31.6%) has much better contrast at higher resolutions. This is great for observing double stars and various star clusters where the stars are visually very close together.

People pay exuberant prices for excellent refractors with an aperture in this size range. Most reflectors cost much less per inch of aperture than refractors, so a reflecting telescope with more aperture and a reasonable amount of central obstruction can have the same or better planetary views along with much better resolution. A 9.8" telescope with a 3.1" central obstruction also has twice the light collecting area than the unobstructed 6.6" aperture, so it can show the observer objects that are half as bright. In terms of astronomical magnitudes (brightness scale), the larger telescope can see objects about 0.75 magnitudes dimmer with the same or better contrast and higher resolution for less money. Think about it, which would you buy?
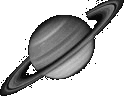
How about some pretty pictures?
Updated: 23 December 2002
| Additional Information |
|---|
| About Astronomy Net | Advertise on Astronomy Net | Contact & Comments | Privacy Policy |
|
Unless otherwise specified, web site content Copyright 1994-2026 John Huggins All Rights Reserved "dbHTML," "AstroGuide," "ASTRONOMY.NET" & "VA.NET" are trademarks of John Huggins |